Before I go deeper into the topic I want to let you know if you are only searching for the solution then you can directly go to the “Solution” section in this article. Otherwise you can read from here…
JS Eventslistener
So when you want to listen for example for an “click” event on any html element, then you have to use “element.addEventListener(‘click’, myhandler);”. So every thing is cool here. Often there is a case that you register these events more than once. So it is a common and good practice to remove the listener before you register a new one. This can be done with “element.removeEventListener(‘click’, myhandler);”. So and here the problem starts…
Problem
You have two main problems when you want your “this” context stays the same (in an handler) and really want to clean the event registration. I will demonstrate the problems in the following examples. I will first setup a base test class which helps us to reduce the code which is used by all concrete test cases.
Test Setting Class
The following class is the our base class for all our coming test cases. And it is only to avoid writing redundant code. So what does this class do is first creating a div element with an id attribute in the constructor. Then it provides a method which simulates a click on this element. (this is only for testing purposes, because I do not want to create an html file…)
Use defined Event Handler
Here is our first try. We have an “addEventListener” method which first call the “removeEventListener” and then register the event handler with a defined method. After then we create an instance of the class and call “addEventListener” for multiple times. And the lasst thing is invoking the simulate click event.
So this solution does only call our defined method “onClickEventHandler” for one time, which is good. But we also loose our class instance context. So we are no more able to call another method in this class instance, because the “this” scope is now the element which was clicked…
Use anonymous Event Handler
So then you could use an anonymous function as event handler which we do in the following example. We invoke the methods in the same order and with the same count as we have done in the previous example.
Here we keep our class instance scope inside the anonymous event handler but the problem is we are not able to remove the event listener. This is because we always need to remove the event listener “instance”. But with the anonymous method we are creating every time when we add or remove the event listener a new function. So at the end our handler will be called twice – which sucks…
Use defined Method which returns Event Handler
Then you might came to the point and try to combine these two things and call a defined method which returns an event handler.
But the problem here is the same like with the anonymous functions, because at least you give the “addEventListener” function an anonymous function. We have only wrapped it into a getter.
Solution
Now it is time for the solution. Here we define first a “that” variable which contains the current “this” context. We defined an event handler as an variable and set a function (our event handler) to it. Now we have a variable which we can use to remove the listener and we can “that” for our class instance “this” context.
Conclusion
So as you can see scoping and removing listeners an be annoying, but we can solve this. But this does not change the fact that it is a little hacky, but that is javascript…
First I have to say that I like Visual Studio very much. It is a good working IDE for development .NET stuff. I used it for over ten years now for mobile, desktop and web development. Yes of course sometimes visual studio can a bit annoying because of it’s performance and “magic” behind the scenes. But at least it is a good Program…
However some weeks ago I needed to reinstall windows and began installing all the required programs which I needed. Then I stopped after installing VS Code and said to myself: “Hm my msdn professional abo has been ended and the next Visual Studio Version (2020) will cost me some money. Let’s try rider? Hm no – before I want give VS Code a real try!” This is because I use VS Code a lot for all my other developments like angular, go, flutter, etc. and I know this should work with .NET.
So my first expectation was that I get some syntax coloring and all the compiling, tests, etc. will be running in terminal, or have to be done in a not so common way.
My Experience
So I knew that I can use also VS Code, but I always thought, that I have to dispense a lot of features. Most of the devs I know work with Rider or Visual Studio Professional/Enterprise, because they thought the same like me. But I was totally surprised that it worked so well. Until now I miss nothing really. It’s quite the opposite. I am enjoying the fast editor and the customizing for the individual needs without manipulating the source of the project.
I started by installing the “C# (powered by OmniSharp)” plugin. That plugin provides syntax highlighting, reference recognition, debugging, etc. I tried this on an existing solution (The root folder where the solution is located needs to be opened). If you want to work with full support by C# plugin you have to work with solution files. When you want to debug your project for the first time, you have to set a launch file. Here you can specify the startproject etc. With this installed you can debug your code, set breakpoints, view variables, add watch expressions and modify the code (like in the immediate window in Visual Studio) within “Debug Console” window.
By the “Visual Studio IntelliCode” plugin you get the same AI intelli sense experience like in Visual Studio. And to get a more powerful importing namespace experience use the “Auto-Using for C#” plugin. It provides importing when typing knowing types. And for a better overview you can install the “vscode-icons”.
If you need a kind of “gui” for the nuget packages you can install the “NuGet Package Manager” plugin, but of course you can also use the dotnet cli for it.
Then I thought ok that is really cool but what is with unit tests. Can I run tests inside VS Code or do I have to use the cli? And the answer is – yes it is very easy possible. So you need first the “TestExplorer UI” and then the “.NET Core Test Explorer” plugin. After installing these you have a new icon on the left which opens the test explorer. You might have to edit the settings to specify on which locations the plugin should be search for unit tests. And then you can go with it.
For creating new solutions or adding projects to the existing solution you have to use the dotnet cli. I thought – but while I wrote this, I have done a quick research and I came to the “vscode-solution-explorer”. With this installed you have the same experience like in Visual Studio. On the left side (activity bar) you have an additional Visual Studio icon. By pressing it you have the same view like in Visual Studio. You can create projects add existing projects, view all references, add nuget packages, etc.
There are thousands of plugins how you can optimize your dev environment for your needs. So but I am happy with the plugins I have addressed here.
Plugin List
C# OmniSharp
Test Explorer UI
.NET Core Test Explorer
Auto-Using for C#
NuGet Package Manager
vscode-solution-explorer
Visual Studio IntelliCode
There are so many more useful C# helper plugins, for code generating etc. But to get started very comfortable this is my recommendation.
Missing
May be there are some tools which you will not get. For profiling, code quality and that stuff I use other tools in anyway which are then part of the pipeline… I really found nothing which I would miss.
Conclusion
So if I work on projects which runs on .NET Core or 5 then I will definitely choose VS Code for now. It feels good to work with. I do not get it why some guys say that VS Code is not so much powerful etc. I tried it and I think I will not install Visual Studio again, except to that point when I have to change some old webforms code :).
Refactoring, debugging, testing and writing the code feels very great to me and the setup was very easy. May be the entry is a little more difficult for new unexperienced users, but I think in Visual Studio you have to know what you are doing to! So give it a try and tell me your thoughts of your experience!
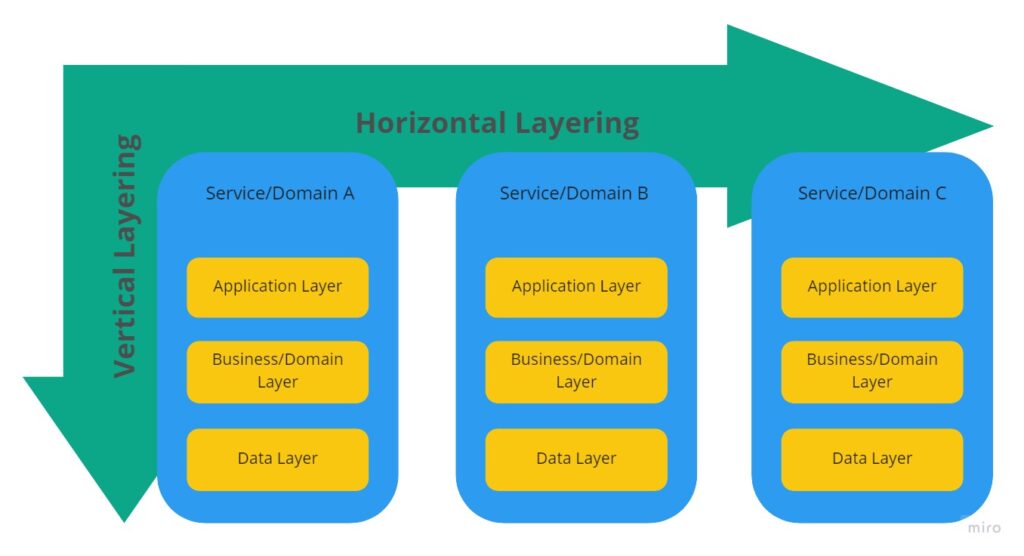
In this post I will share some ideas about structuring a software application. I will describe what horizontal and vertical layering for me is and show how they can be applied.
Why
Layering an application is useful for having a better overview of the application it is clear what to expect in the specific layer. You have less complicated and non-transparent dependencies. This all applies for vertical and horizontal layers but take affect in a different way. At least you end up with a much more modular app which can be tested/unit tested more easily and is open for extension and different deployments.
Overview
In short vertical layering is about application layers inside a microservice, monolith, etc. – at least inside of single executable application. Horizontal layering is about splitting an application into different domains/services/components (e.g. microservicearchitecture). See the diagram below.
image by author
Vertical
Layering helps a lot to get a better overview over the application. It is much easier to find things, because you know what to expect in the specific layer. And it is always clear what I can do in the specific layer (because of the contracts in the specific layer). It prevents unwanted use of code in the wrong layer. For example (in .net webapi) exposing business entities to the outer world of a web api. Or accessing the data layer directly from the controller – and so on… (When you can manipulateentities where ever you are in the program it is dangerous and you will loose the control over them and it could be come to invalid manipulations, etc.)
Furthermore you automatically avoid cycling dependencies. For example – imagine you have two application services. Each service uses a business or domain service for creating and persisting the same business entity (and do their other specific service stuff…). Because of “sharing code in business layer” or better to put that business/domain logic into it, the possibility of cycling dependency is less than using all service in one layer, because it is then not clear what to use and what not.
It is not really the thing how many layers do you have (this depends on your needs), but you should have them and only expose access through a contract to the next upper layer. In the diagram you see how this is applied.
image by author
For example in C# you can do this kind of separation in two ways. Imagine we have data, business and application layer.
First Method
You can create a project for every layer plus a contract for each one (like in the image). The data layer knows only it’s own contracts. The business layer knows from the data contract project and it’s own contract project. And the application layer knows only about business layer contract and it’s own project. With this you avoid directly accessing entities from the application layer.
Second Method
You can create a project for each layer (application, business and data). And put the contracts directly in folder from that specific project. The business layer knows the data layer. And the application layer know the business layer. So to avoid direct access to the implementation we can mark the implementation classes as internal and only the contracts as final.
I like the first approach a little more because it is directly more clear and I can share the contracts as a library easily without the implementations. But both are doing there job.
Horizontal
Horizontal layering is for me building and using components, or sometimes libraries but above all it is separating an application into different services.
For example microservices are a good example for horizontal layers. And/or splitting an application into multiple domains. And these domains are self contained and have no need to communicate with others. Then you have multiple services which are scalable and it is clear what they are doing. Of course sometimes/often services (when using DDD in subdomains) need to communicate, but this is mostly done over messages (message brokerin microservices) and or service endpoints. So there is no direct use of domain logic outside the domain from the service.
Conclusion
So today I would say the most important thing is to have horizontal layering to provide better possibilities to scale the application and the other mentioned stuff. But I think it is also important to have vertical layering. The more code you have in one application the more it is important to have vertical layering. For example a monolith without vertical layers is absolutely horrible to maintain and I could bet the dependencies are very confusing and it is not really clear what will be used where… If had build your monolith/big service in vertical layers, it is much more easy to create horizontal layers from it. So for me both are layering styles are important and has partly similar and sometimes other advantages then the other.
If you questions or suggestions or if you see this completely different please make a comment and we can speak about it. I am always happy to hear perspectives from other devs.
Using .NET, Angular, Kubernetes, Azure/Devops, Terraform, Eventhubs and other Azure resources.
This is one part of a serie. So if you have not read the PART 0: OVERVIEW you can go there and read it to get an overview of what we will actually doing here …
Introduction
Welcome to the first part! Now we are doing our first steps to build our notifier web application. Here we learn how to create our needed infrastructure in azure with the help of terraform. In this part we only uses a local backend for terraform which is not good, because then we run into problems when we working in teams or when we want to use pipelines. This we will cover in the next part, where we will create build/release pipelines for the infrastructure. We are going not to much deep in each configuration for the resources we create. There are so many things which are very important to know when working with all this. So I strongly recommend to go deeper into it by building your projects and researching for your needs.
Please keep in mind that when you run this terraform code you have to pay for the created azure resources. So the best is to delete the created resource groups after testing it!
What resources do we need?
If we go back to the overview part, then we see that we need the following:
Application Insights – showing the communication in our environment, log our notifications and errors etc. from our services.
Terraform
Use Infrastructure as Code to provision and manage any cloud, infrastructure, or service
https://www.terraform.io/
For me this means that it is possible to code the infrastructure no matter for what cloud. But this does not mean, that you can use your infrastructure code and change the cloud provider without changes. It means that terraform provides most cloud providers, but resources are obviously different. However coding the infrastructure has enormous advantages which are for me:
Put the infarstructure (as code) in a repo (versioned infrastructure)
Easily create complete new stages with same infrastructure (dev, tst, acc, prd, etc.)
Prerequisites
Terraform
First download the terraform cli for your os (I will use windows here for all samples– but this should not really matter). Then we need to access the cli from any location in our command line program. For this I will put this downloaded executable in C:\terraform and add a new entry in the path environment variable. If it is all correct then you should get the terraform help list by typing “terraform” in your bash/terminal/command line.
Azure CLI
Furhtermore we need the Azure CLI for authenticate to our azure account. I will do this easily with PowerShell command (Adminmode is required for this process!).
After installing the Azure CLI and please reopen your command line tool. Then type az. Then you should see commands from provided by the Azure CLI. Now it is time to authenticate to you azure account by typing:
az login
The browser opens automatically and you need to enter your credentials from your Microsoft account which are connected with the Azure portal. Now you will see your azure subscriptions in your command line.
Start creating
So now we will definitely start to create something. First lets create a git repository in our azure devops project “Notifier” and name it “Infrastructure” (how to). Clone it into a folder. In my case “C:\Repos\Notifier”.
Then we need an editor for writing our terraform code. I will use VSCode with the following terraform plugin Azure Terraform, but this does not really matter, we could use a simple editor for it.
Initial Terraform configuration
All starts with the main.tf file. (When calling “terraform plan” it will use all “.tf” files in the folder where terraform will be executed.) Here we can define some base settings, resource group, etc. So let’s go and create a main.tf file in our infrastructure root directory.
# Define the required provider by terraform.
provider "azurerm" {
  features {
  }
  version = "=2.33.0"
  skip_provider_registration = "true"
}

provider "helm" {
  version = "= 2.0.2"
  kubernetes {
    host                    = azurerm_kubernetes_cluster.aks.kube_config.0.host
    client_key              = base64decode(azurerm_kubernetes_cluster.aks.kube_config.0.client_key)
    client_certificate      = base64decode(azurerm_kubernetes_cluster.aks.kube_config.0.client_certificate)
    cluster_ca_certificate  = base64decode(azurerm_kubernetes_cluster.aks.kube_config.0.cluster_ca_certificate)
  }
}

# Defines our first resource - the resource group in which we create other resources.
resource "azurerm_resource_group" "rg" {
  name     = "rg_notifier_example"
 // The resource group name in azure.
  location = "West Europe"
}
The provider we are using is the “azurerm” to handle resources in azure. (When you set the “skip_provider_registration” to false, then you need to provide these in azure – what we will not cover here.). Second we define a provider for helm for creating nginx ingress controller. Then we define a resource group which we want to create.
Then we need one additional file “backend.tf”. Technically we could paste all the code in the main.tf file, but this is not very good arranged. So let’s create it in the same directory.
terraform {
  backend "local" {
}
}
We work in this part only with a local backend, so no more are required here at the moment. This means the terraform state will be created locally. (In the next chapter we change the local to a remote backend.)
Now we can initialize our terraform and create a resource group in azure. Now we have to trigger the initialization process by calling:
terrafrom init
Terraform will respond with a successful initialization message. Now we can “plan” our terraform script. The plan generates all terraform changes, adds and deletions. Terraform always uses the current state to determine the changes etc. This will not create any resource in azure! It is only a preview what will be changed when calling “apply”. So let’s check out the plan:
terraform plan
So you should see the resource group as an “add”. You should not see a change or destroy in the plan. Ok then it is time to really create our first resource. This will be done by “apply”. Apply also produces a plan which can be accepted. If “yes” then we will really made the change in azure. Ok then:
terraform apply
When we go to the azure portal, we should see our created resource group there! (Sometimes azure needs some time to finish the creation process, but this should not take long– no more than one minute.) With “terraform show” we can always take a look at our current state.
You should never change resources manually in the portal. If you do that your terraform state gets totally confused and you can damage a lot with this. So everything should be done with terraform.
Now we have all initialized, except the workspaces. In terraform we can create different workspaces and can so manage resources for different environments/stages. In our example we want limit us to use only two stages. This will be enough for demonstrating the use for it. Our application will have an “acceptance” and a “production” stage. So let’s create terraform workspaces for these two stages.
# Creates our acceptance workspace
terraform workspace new acc

# Creates our production workspace
terraform workspace new prd

# Show all worspaces (the star in the list marks the current workspace)
terraform workspace list
# Select a workspace which will be used inside the terraform code
terraform workspace select acc
Now we can take advantage of the workspaces in our terraform code. But first let’s create a folder named “settings” in our Infrastructure root folder. Inside the settings folder we create three files “prd.yaml”, “acc.yaml” and “common.yaml”. Then we add a line for the environment specific resource. One for “acc”…
resource_group_name: notifier-resource-group-acc
… and one for “prd”…
resource_group_name: notifier-resource-group-prd
… the common.yaml we need later to specify properties for all environments.
Then we reference the setting files in the main terraform script and merge the common and workspace specific settings to one settings. We use the “terraform.workspace” variable to load our setting file for that current selected workspace. Then we use our first setting variable for the resource group name. So we have a resource group for every environment. Here is the edited main.tf file:
# Define the required provider by terraform.
provider "azurerm" {
  features {
  }
  version = "=2.33.0"
  skip_provider_registration = "true"
}

provider "helm" {
  version = "= 2.0.2"
  kubernetes {
    host                    = azurerm_kubernetes_cluster.aks.kube_config.0.host
    client_key              = base64decode(azurerm_kubernetes_cluster.aks.kube_config.0.client_key)
    client_certificate      = base64decode(azurerm_kubernetes_cluster.aks.kube_config.0.client_certificate)
    cluster_ca_certificate  = base64decode(azurerm_kubernetes_cluster.aks.kube_config.0.cluster_ca_certificate)
  }
}

# Here we define settings which will be used when creating the resources.
locals {
  default_tfsettings = {

  }

  commonSettingsFile = "./settings/common.yaml"
  commonSettingsFileContent = fileexists(local.commonSettingsFile) ? file(local.commonSettingsFile) : "NoTFCommonSettingsFileFound: true"
  commonSettings = yamldecode(local.commonSettingsFileContent)

  workspaceSettingsFile = "./settings/${terraform.workspace}.yaml"
  workspaceSettingsFileContent = fileexists(local.workspaceSettingsFile) ? file(local.workspaceSettingsFile) : "NoTFWorkspaceSettingsFileFound: true"
  workspaceSettings = yamldecode(local.workspaceSettingsFileContent)

  settings = merge(local.default_tfsettings, local.commonSettings, local.workspaceSettings)
}

# Defines our first resource - the resource group in which we create other resources.
resource "azurerm_resource_group" "rg" {
  name     = local.settings.resource_group_name
 // The resource group name in azure.
  location = "West Europe"
}
Adding further resources
Now we have to add our resources we need for the application …
Application Insights
First we create a file named “application-insights.tf” in this we put the following code to create the resource. (Terraform will automatically detect the new .tf files.)
resource "azurerm_application_insights" "ai" {
  name                = local.settings.application_insights_name // Name of the resource defined in the settings file.
  location            = azurerm_resource_group.rg.location // Use resource group location.
  resource_group_name = azurerm_resource_group.rg.name // Use our resource group from the current workspace.
  application_type    = "other" // The type of application. We use "other" here, so it is not so specific like "web", "java", etc.
  retention_in_days   = 90 // The default retention used here.
  sampling_percentage = 100 // To get the most accurate results without so many loose of data.
}
This is very simple right? So we define here the resource where we set the name from the settings file depend on the workspace we have selected. The location and resource group name came directly from our created resource group in the main.tf before. But we definitely need to add the application insights name in the setting files.
After this is all done we can call terraform plan to verify our changes und then apply to create the resource. Please make sure that you have selected the “acc” workspace. Ando not wonder when you call “plan” that the resource group resource will be added again. This is why we have applied the plan in the default workspace and not in the acc! In this part we will apply only in acc. In the next part when we create a pipeline for the infrastructure this will be done by the release!
terraform plan
terraform apply
Container Registry
Creating a container registry is also easy as with the application insights. Create a new file called “container-registry.tf” and put the following code to it. Please read the comments for more information.
resource "azurerm_container_registry" "acr" {
  name                = local.settings.application_insights_name // Name of the resource defined in the settings file.
  location            = azurerm_resource_group.rg.location // Use resource group location.
  resource_group_name = azurerm_resource_group.rg.name // Use our resource group from the current workspace.
  sku                 = "Basic" // We will use the not so expensive one for this demo.
}
Then like always add entries for the name in the setting files. But for this resource we can only use lowercase alpha numeric values, so we can not use the “-” for separating words.
container_registry_name: notifiercontainerregistryacc # Some resources can only use alphanumeric names.
container_registry_name: notifiercontainerregistryprd # Some resources can only use alphanumeric names.
And apply our new stuff …
terraform plan
terraform apply
Kubernetes Service (AKS)
Time for adding our k8s cluster. Create a file in the “Infrastructure” root folder (like with the others) and name it “kubernetes-cluster.tf” and put the following code into it for a basic managed k8s cluster.
resource "azurerm_kubernetes_cluster" "aks" {
  name                = local.settings.aks_name
  location            = azurerm_resource_group.rg.location
  resource_group_name = azurerm_resource_group.rg.name
  dns_prefix          = local.settings.aks_dns_prefix

  default_node_pool {
    name       = "default"
    node_count = 1
    vm_size    = "Standard_A2_v2"
  }

  identity {
    type = "SystemAssigned"
  }

  tags = {
    Environment = local.settings.aks_tag_environment
  }
}

output "client_certificate" {
  value = azurerm_kubernetes_cluster.aks.kube_config.0.client_certificate
}

output "kube_config" {
  value = azurerm_kubernetes_cluster.aks.kube_config_raw
}

resource "helm_release" "ingress" {
    name      = local.settings.ingress_name
    repository = "https://charts.bitnami.com/bitnami"
    chart      = "nginx-ingress-controller"
    set {
        name  = "rbac.create"
        value = "true"
    }
}
This is a very basic config for the cluster. Please take a look at terraform to get more infos. The vm_size defined in line 10 should be minimum “Standard_A2_v2”. You need 2 CPU’s and 4 GB RAM. I took the “Standard_A” version, because it is sufficient for testing purposes and it is to that fact a little cheaper.
At least we define a helm release ingress resource. This is our ingress controller which creates a public id and make it possible to reach the aks outside of the cluster. We use two workspace dependent settings here which we have to add in our setting files.
aks_name: notifier-aks-prd
aks_dns_prefix: notifieraksprd
aks_tag_environment: Production
And again apply our new stuff … This can take some time (ca. 5 minutes). After everything worked correctly you get an output with a client certificate.
terraform plan
terraform apply
Event Hubs
For creating our event hub, we need first an event hub namespace in which our notifications event hub will be running in. For this please create a file named “eventhub-namespace.tf” and put the following code into it.
So nothing special her … We create a namespace for each workspace and use workspace settings to apply different configurations. The “sku” must be min “Standard”, but terraform will inform you about that, if you try basic :).
Before we declare the needed settings lets create our actual event hub, because there we will need to add some more settings. Now we create a file and name it “eventhub-notification.tf” and put the following code to it.
In the first section we create the notifications event hub. In the next section our two needed consumers. (The two notifier workers – app insights and email). And in the last part we set authorization rules for this event hub. We set a rule for sending and receiving messages. And when we come to the end for every resource we need to add our used setting variables in the workspace files.
To save the notifications we a need a storage and we want to store the data in azure table storage. For this we need a storage account resource. We could create the table in our services, or directly in terraform. For this time we will create it in the service later.
Create a file named “storage-account.tf” in the also known “Infrastructure” directory and put the following code in there:
In the first part we define the storage account and use the version 2 of the storage account here, but actually the V1 should also work. Our replication type is LRS which means, that our data will only be replicated in one region, which is totally ok for our use. The second part creates the table inside our storage account. Now we need to define the storage account names. (Here are only lowercase alphanumeric values allowed.)
storage_account_name: notifierstoreacc
storage_account_name: notifierstoreprd
and again …
terraform plan
terraform apply
Key Vaults
For getting access to our resources we need connectionstrings and passwords, etc. The best place for it are the key vaults. The key vaults can be used in pipelines and in our .net core services. We should create key vaults for each service. This does not really matter here, because the secrets are nearly the same, but we want to do it in a microservice manner and separate them. So we have access control over these entries per service.
Before we start to create the key vault configurations we need to add some common settings.
Your tenant you can find by “az account list”. For your the object id from your current user (The user you are logged in with az login.) you can find in the azure portal. Azure Active Directory -> Users -> YOUR USER. This is needed for the key vault access policy. We will see very soon…
Now we need to add some workspace specific settings and add the key vault names.
First we define the key vault. The second one is very important – the access policy. Here we define where has access to the key vaults. We already defined this in our common file – do you remember? And in this definition a foreach loop iterates over these settings and set access for the defined object id’s, which can be groups, users, or service connections. In the last section we create our entries for application insights, the connection string for the storage account (storage tables) and the connection string for sending messages to our notifications event hub.
Let’s go to the next key vault by creating a file named “keyvault-worker-appinsights.tf” and putting the following code to it:
The definition is analog to the previous key vault. We create here an application insights and an event hub with listen connection string secret here.
Next the last one which is nearly the same except the name of the key vault. So create a file named “keyvault-worker-email.tf” and put the following code into that file:
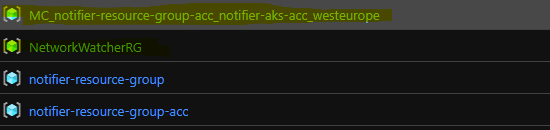
If everything had worked correctly the notifier-resource-group-acc in the azure portal should look like this.
image by author
Now you could check the event hubs and check, that we have our two consumers there and a shared access policy for “send” and “listen”. And make sure all secrets was written in the key vaults, but this should all be ok, else terraform has report us an error.
Please also notice two more resource groups which was created by helm for the ingress controller.
Conclusion
So you have “learned” how to start with terraform and create a bunch of resources which we will need for our scalable notifier web application. There are a lot of more options for every resource we have defined. Please take a look at terraform.
In the next PART 1.1 we will create pipelines for our created infrastructure. This is very helpful. Then we do no more have to do “plan” and “apply” in our command line. It is then a part of the overall publishing process with all it’s benefits like, CI, approval process, stages, etc.
Using .NET, Angular, Kubernetes, Azure/Devops, Terraform, Eventhubs and other Azure resources.
image by author
This post will be he first of a series, because it makes no sense to put all that stuff into one post. So this post will outline the overall demo application and infrastructure and how we will start to develop it.
What do we learn here?
We will build a modern style web application environment which uses a lot of technologies to bring that up and running. We learn how to wire all that pieces together and automate them. Starting by creating the infrastructure in azure using terraform and integrate it with azure devops pipelines. Then we are going to create a simple webapi in .net core which uses azure tables to store data and an event hub for posting messages to our system. After then we need to create multiple worker which can consume our messages. And at least a small functional user interface in angular which uses the webapi. We will talk a lot of configurations, keeping secrets secret and other stuff which can make problems when connecting all those parts.
What we will not do!
This demo application/environment will be far away from a complete production ready application. There will be no authentication or other security things which are extremely important, nor sufficient error handling, unit tests or great design patterns inside each software piece, etc. The pattern here is more the overall environment with pipelines, message broker, small services, etc. The code logic will be very simple, so we can concentrate on things we want to learn here.
Which technologies/tools we will use for coding, deploying and hosting?
For programming the backend will use C#/.NET Core/WebAPI and Angular/TypeScript for the frontend. We use Azure DevOps for the build/release pipelines and source control (.git). The complete infrastructure will be created in Azure with Terraform for defining the infrastructure in code. In Azure we will use Event Hubs as our Message Broker, Azure Tables to store the Notifications, Application Insights as one of our notification receiver, Key Vault to keep our secrets secret, Container Registry for our Docker Images and a Kubernetes Sevice (AKS) for hosting and managing our Docker Container.
What kind of functionality are we developing?
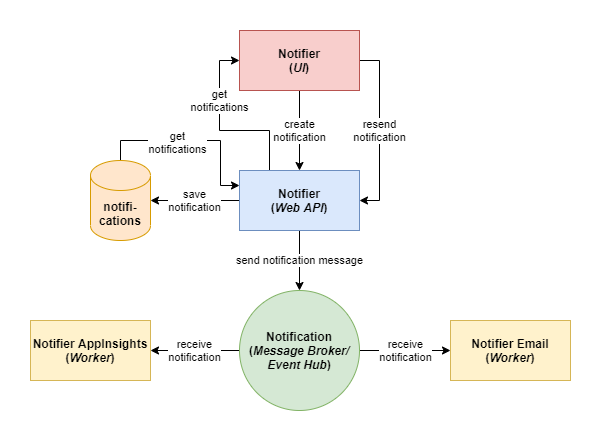
I think of a very small “notifier” application could make sense here. I think with this, we get all parts explored. The functionality is very simple. The app provides an interface for creating, listing and resending notifications to there consumer.
I start explaining the flow at the top of the diagram below. First the user should be able to create a notification via the user interface (made here with angular). The ui calls the web api to create a notification. The web api stores the notification in the table and sends a notification message to the event hub. At least the two consumer (application insights worker and email worker) receive them and do there job. The web api provides an additional “get notifications” endpoint by which the ui can read them. So then the user could select one or the other and resend the notification(s).
image by author
Actually we do not need this “complex building” to realize this simple functionality, but this one has the known advantages of a microservice architecture and scalable system which I will not explain here to keep this short as possible.
What are the next steps?
In each part I will explain one “brick” to get this all to work. I explain in every specific post what we do need and achieve here. In a real world project it would make more sense not to split all the infrastructure tasks in one part (and for example) the web api into another.
Before we are going to start we should prepare a little bit. So we need an Azure DevOps account. And create a project named “Notifier”. Make sure that you choose git for source control! The work item template does not matter to us, because we will not use it. Then we need an Azure account. When we have this done we can start. Following the steps. So then lets go … (But I will spare myself the saying “Let’s get your hands dirty.”)