Categories
.net architecture azure C#

PART 2: WEB API – Building a Scalable App Environment with Infrastructure and Deployment

Using .NET, Angular, Kubernetes, Azure/Devops, Terraform, Eventhubs and other Azure resources.
Image for post
image by author

This is one part of a series. So if you have not read the PART 0: OVERVIEW you can go there and read it to get an overview of what we will actually doing here …

Introduction

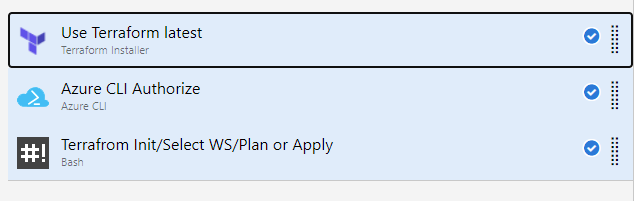
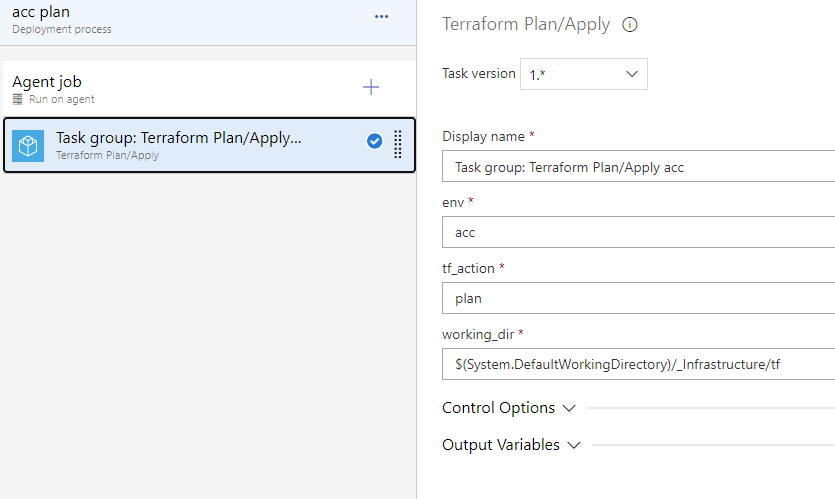
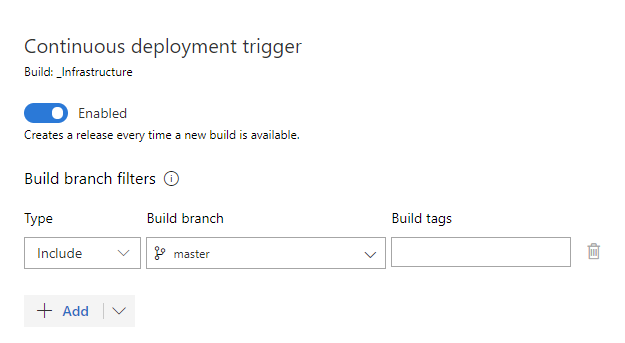
In the last PART 1.1: INFRASTRUCTURE PIPELINE we have finalized the infrastructure part with building our pipeline for it.

Now we are going further and start the web api for our notification application environment. We will build the web api in .net core. The web api provides two endpoints. One for creating a message and another for getting all messages. This is sufficient for our example. Furthermore we implementing the use of azure storage table, event hubs, application insights and key vaults.

Yes – I repeat myself, but all the code here is not really complete production ready (error handling, retries, tests, etc.). Maybe I will put some more features (if there is anyone interested in) to all parts of this application, when we are ready with our base version. But our base versions has already a lot of stuff in there, so lets start…

Prerequisites

We only need an editor or development environment for .net and the .net core 3.1 framework for creating a .net core application (But I think this is obvious!). And we need the “Common lib” for our .net projects which will be described below.

Common lib

We need the common lib for this part as well as for our workers (next parts!) which should handle the sent notifications. The common lib source can be downloaded/cloned from the feature/part2 branch and put it next to the infrastructure folder. I will not list all the code here, but I will give a short overview about the content and describe the folders below.

Data

In this folder is the notification entity located which are saving in a azure storage table. For this there is also a repository, which take the job for communicate with storage table. (Please read the code for getting more information how this work in detail and or visit https://docs.microsoft.com/en-us/azure/cosmos-db/tutorial-develop-table-dotnet – and do not be confused that we are using the cosmos db api. This api is working with azure storage table.)

Extensions

One extension is to register to application insights and the other one for using the key vaults where we get later our secrets from. The key vault credentials will be pushed via environment variables (but this is part of the next part – 🙂).

Protobuf/Messages

The protobuf folder contains the notification message which we will be used to send/receive to/from our eventhub. I choose to send the message via this binary format. The messages folder contains the C# version of the message (which we will use in our code). If you take a look at the “Notifier.Common.csproj” fill you will find an item group which take this generation job (for this the gprc tool will be used).

Settings

Here are all settings defined as objects, which we will use in our needed .net projects.

WebApi

Again we should here create first a repository for the web api where we can push our code for creating the pipelines etc. in the next part. So let’s create an azure devops repository named “WebApi” in our “Infrastructure” project and clone this next to the “Infrastructure” and “Common” folders. The complete sourcecode can be also downloaded/cloned here.

Base Setup

Now create a .net core console project and name it (incl. the solution) “Notifier.WebApi”. We start by editing the “csproj” file. So replace/edit your contents with the following.

One interesting thing in the first property group is the “UserSecretsId”. So yes we use for local development the user secrets feature. So no secrets has to be in the repository. (The user secret will be created when you right click for the first time the “project -> manage user secrets”. Here we will do it directly in the project file and a good thing is to add the application name to the secret. Else it is very hard find it on your computer.)

The next item group is obvious. The “appsettings.json” which we will create very soon!

Then we have some nuget packages we will need for our web api and last but not least including the common lib as a project reference (make sure the path is right in your environment). A better approach would be to add the common lib as a git submodule or nuget package, but for now this is ok here.

It is time to create the “appsettings.json” file in the project root. Please put the content below into that file.

First we configure the log level for our logging. Then we see settings for our azure resources. These are secrets, so we will define them in our user secrets file later. And at last the core settings which is for our later angular frontend to access the the web api without cors issues.

Let’s go to our user secrets file. For this right click the project and select “Manage User Secrets”. If the file does not open (sometimes with older .net core versions I had the issue) you could do it by using the .net core cli or simply open the file located in “C:\Users\{YOUR_USER}\AppData\Roaming\Microsoft\UserSecrets\notifier-webapi-6fd34aeb-1b78-4492-86dd-a5aa00ce38cd” then put the following in there and find your secrets in your azure portal.

We use here the secrets from our acceptance environment. Here can you find your secrets…

  • Application Insights – Instrumentation Key: select notifier-application-insights-acc resource -> Overview and find the key on the top right.
  • Storage Table – Connection String: select notifierstoreacc resource -> Access keys and then copy the primary connection string.
  • Event Hubs – Connection String: select eventhubs-acc -> Event Hubs -> notifications -> Shared access policies -> send and copy the primary connection string.

Implementation

We start by directly implementing the functionality of the api. Later we wire this together when we setup the “Program.cs” and “Startup.cs”. we do this in this order, because else we have to jump between files and/or have to deal with errors because the things we want to wire are not existent at this time…

So let’s start by creating the model for the notification response. Please create a folder “Models” in the root project directory and create a class named “NotificationModel.cs” and put the following in to it.

The model only contains a message and a timestamp. So let’s go further with the services. For this create a folder named “Services” and create the following in files in there:

Above the service interface (“INotificationService”) with two simple methods in there. And now the implementation (“NotificationService”):

The constructor takes arguments for the logger, eventhub settings (object come from the common lib) and the repository which is also located in the common lib. With this we have all to start here. The “CreateAndSendAsync” does exactly what it is called. First it creates the entity and save it into the table and second it sends to the event hub. The functionality is split into two private methods which makes it more cleaner and better to read. Please check the private methods and the common lib functionality for further information how the event hubs and storage table is used here. (This is a very simple implementation herem without retries etc.)

Now we are ready to create the controller which defines our endpoints. So we start again with creating a folder “Controllers” and create a class named “NotificationController.as” in there and put the following code into it.

We inject the notification service here to let the service do our work. The controller creates the endpoint and format the response for our two methods. So we created here the following endpoints:

  • GET /api/notifications – returns all notifications
  • POST /api/notifications – create, save and send the notification

This is all we need for the logic! Now we need to wire this together…

Wiring the Parts

We start with the “Program.cs” where the entry point of the application is. Please open that file and replace the content with the following.

We start creating the host when the main function is called. At first we configuring the app by calling “ConfigureAppConfiguration”. We add the appsettings.json, environment variables and commandline arguments to our configuration. The we add (or try to add) the user secrets (which is the case in local development). Then we add (or try to add) the key vault (which is the case when we pass the credentials for it via environment variables – but we will discuss this in the next chapter). All the secrets will be replaced by user secrets or key vault. Next we configure our logging. First we register our console logger and second to log in application insights (which results in traces there). And in the last step we configure our web server where we will use “Kestrel” and call our web server startup class “Startup.cs” which contains the following.

Here we will do some startup stuff, but the main focus should be how configure our services. In line 45 we start configuring our app settings, so we can inject them with the IOptions<T> interface in our services, etc. Then we add the repository, and the notification service to our di context. You will find some other basic configuration here, which I will not describe here in detail.

Test

If we have all done here correct, you could run the application locally and test the endpoints. You could use postman or like me the the REST Client (for visual studio code plugin), which is quiet cool, because I can code my requests here and versioning them, etc. Following the requests:

So and if you have created some messages and get them you could check application insights on azure portal and view for example the logs (notifier-application-insights-acc -> Logs -> traces). Or check the application map, which should should show the connection between the components. At this time we can see that our web api sends to event hub and calls to to the azure table.

Conclusion

We have created a .net core web api here which cares about secrets and uses diverse azure resources like event hubs, application insights, key vaults and azure tables. We can now create, persist and read/receive notifications.

Preview

In the next PART 2.1, we will bring the web api to our acceptance stage running in docker and the kubernetes cluster. And this we want to integrate and automate in the azure pipelines.

Categories
architecture azure devops

PART 1.1: INFRASTRUCTURE PIPELINE – Building a Scalable App Environment with Infrastructure and Deployment

Using .NET, Angular, Kubernetes, Azure/Devops, Terraform, Eventhubs and other Azure resources.
Image for post
image by author

This is one part of a series. So if you have not read the PART 0: OVERVIEW you can go there and read it to get an overview of what we will actually doing here …

Introduction

In the last Part 1 INFRASTRUCTURE we have created the resources we need for our scalable web application. In this part we want to automate the infrastructure by creating a pipeline for it. The goal of it is like with every other pipeline. We can deliver our infrastructure via continuous integration and approval process for different stages.

We need to download terraform inside our build agent. For this we have different possibilities. We could do this “manually” (bash script) or use the terraform build/release tasks. I wanted to use the build tasks, because they take a lot of work away from you, but they can not deal with workspaces and that sucks. The first “problem” was to select a workspace. This is not supported. So you can do it with bash. And yes this works. But the problem is, that the task does not take the selected workspace. It takes me hours to identify what is going wrong there, but there is a bug in that task.

So I decided to use the build task to download terraform to the agents and do the rest (authentication and terraform actions) via bash commands.

Furthermore I have to say that I had some issues to determine/fix while building this pipelines. This may differs totally from environment to environment. But the good thing is when you will try to fix your personal issues you will learn a lot of how terraform and azure works.

Prerequisites

You need something to do before we can really start with the pipelines… First you need to work through the first part (PART 1), where we have created our terraform configurations. These can also be downloaded/cloned from https://dev.azure.com/sternschleuder/Notifier/_git/Infrastructure?version=GBfeature%2Fpart1.

Terraform Build/Release Task

Go to the terraform build/release tasks and install the task into you azure devops environment.

Azure

First delete all resources that we have created in the PART 1 of the series (best way is to delete the resource group we used there), because we want to create everything new with our pipelines. And to avoid different states and other problems.

Then we create a resource group which is explicitly used for creating the resources. Or in other words to persist our terraform state remotely, so we can work with pipelines, local and with other developers sharing the same state.

So for this please create a resource group named “notifier-resource-group”. We need a storage account which used by terraform to save the states. So create one and name it “notifiertfstore” and choose the even created resource group as resource group for the storage. Then go inside the storage and choose “Storage Explorer” and right click on “BLOB CONTAINERS” and “Create blob container” and name it “notifiertfstate”. This is the location where terraform will create the states.

And a good thing would be to add a group in azure and add your user account to it (the account where you have logged in to azure cli “az login“). This is a good thing when we wanted to use terraform plan/apply from local or if other devs wanted to do this. Else there could be some auth errors when accessing the key vaults resources. So go to “Azure Active Directory” click “Groups” and create one named “notifier-devs”.

Code Changes

First open the “backend.tf” file and replace that code with the following:

terraform {
  backend "azurerm" {
    tenant_id            = YOUR_TENANT_ID
    subscription_id      = YOUR_SUBSCRIPTION_ID
    resource_group_name  = "notifier-resource-group"
    storage_account_name = "notifiertfstore"
    container_name       = "notifiertfstate"
    key                  = "terraform-notifier.tfstate"
  }
}

Here we are going to use our new created remote backend for persisting the terraform state. Please set here your tenant and subscription id (You can get this information by “az account list” – id is the subscription id!).

Now we need to change our “common.yaml” to the following. We add here our service connection to have also access to our keyvaults. Do not forget to replace the placeholder in capitals with your information! The “YOUR_SERVICE_CONNECTION_OBJECT_ID” you will get from the azure resource manager service connection created later in the build pipeline section. After the service connection is created you will find the service connection name and object id in azure in azure ad under app registrations.

tenant_id: YOUR_TENANT_ID

kv_allow:
    YOUR_SERVCE_CONNECTION_NAME: # Service Connection (principle which used in azuredevops pipeline)
        object_id: YOUR_SERVICE_CONNECTION_OBJECT_ID
        secret_permissions: ["get", "list", "delete", "set"]
    notifier-devs: # Allow group
        object_id: YOUR_NOTIFIER_DEVS_OBJECT_ID
        secret_permissions: ["get", "list", "delete", "set", "recover", "backup", "restore"]

Build Pipeline

First we create the build pipeline and initialize terraform for our workspaces and validate them. Furthermore we create the artifact with the terraform files to later create the resources in the release pipeline.

Let’s got to azure devops now and navigate to your notifier project pipelines. The press “create pipeline” and choose Azure Repos Git for your source. Select the “Infrastructure” repository. Choose then “Starter pipeline” and click “Save and run” und yes commit it directly into the master branch. After the job has been successfully finished. Check out the repository changes from the origin. After that you should see “azure-pipelines.yml” file und your “Infrastructure” folder. From here we start to add our needed build stuff. So open the file in your editor and let’s go…

First thing to do is delete all stuff in there and then copy the following.

trigger:
- master

resources:
  repositories:
  - repository: self

pool:
  vmImage: 'ubuntu-latest'

The trigger sets a branch where the pipeline will be automatically triggered. The repository source is to include the repositories which needed in the build. This is in our case only “self” (the repository which triggered the build). And the pool where we define our vmImage. We set it to latest ubuntu.

If we have this done, we can go to the steps. First delete all the code inside the steps section. As the first action we install terraform with the “Terraform Installer” task.

steps:
  - task: TerraformInstaller@0
    displayName: Install Terraform Latest 
    inputs:
      terraformVersion: 'latest'

Then we need to authorize to azure. We do this with a “Azure CLI” task. But before we can do this we have to create a service connection in azure devops to add azure into azure devops. For this do the following:

  1. Click on “Project settings”
  2. Click on “Service connections” in the “Project Settings” sidebar
  3. Click on “Create service connection”
  4. Choose “Azure Resource Manager” and click “Next”
  5. Click “Service principal (automatic)” and “Next”
  6. Select Scope Level “Subscription” and choose your azure subscription
  7. Leave the resource group empty, so you have access to all resource groups from your subscription. (maybe there will pop up an auth window where you have to login with your azure credentials)
  8. And enter a name for the Azure Resource Manager connection (In my case “ARM Notifier”)

After we have created the service connection, we can add the task. Leave a blank line after the last step and put the following code in to it… And care about indentation! (yaml is very sensitive with this)

  - task: AzureCLI@1
    displayName: Authorize Azure
    inputs:
      azureSubscription: 'ARM Notifier'
      scriptLocation: inlineScript
      inlineScript: |
        echo "##vso[task.setvariable variable=AZURE_CLIENT_ID;issecret=false]${servicePrincipalId}"
        echo "##vso[task.setvariable variable=AZURE_CLIENT_SECRET;issecret=true]${servicePrincipalKey}"
        echo "##vso[task.setvariable variable=AZURE_SUBSCRIPTION_ID;issecret=false]$(az account show --query 'id' -o tsv)"
        echo "##vso[task.setvariable variable=AZURE_TENANT_ID;issecret=false]${tenantId}"
      addSpnToEnvironment: true

This task authorize us with our created “ARM Notifier” service connection. Now we can initialize an validate our configurations. We do this with following bash task where we are using the “ARM” environment variables. Which we putting under the azure cli task with line break in-between.

  - bash: |
      terraform init
      for ENV in "acc" "prd"
      do
        terraform workspace select $ENV || terraform workspace new $ENV
        terraform validate
      done
    workingDirectory: '$(System.DefaultWorkingDirectory)'
    displayName: 'Terraform Init/Validate configuration'
    env:
      ARM_CLIENT_ID: $(AZURE_CLIENT_ID)
      ARM_CLIENT_SECRET: $(AZURE_CLIENT_SECRET)
      ARM_SUBSCRIPTION_ID: $(AZURE_SUBSCRIPTION_ID)
      ARM_TENANT_ID: $(AZURE_TENANT_ID)

We directly go further by adding another task which copies our terraform configs the artifact staging directory. So put…

  - task: CopyFiles@2
    displayName: Copy Terraform Configs
    inputs:
      SourceFolder: '.'
      Contents: '**'
      TargetFolder: '$(build.ArtifactStagingDirectory)'
      CleanTargetFolder: true
      OverWrite: true

And the last task is to publish the artifact…

  - task: PublishBuildArtifacts@1
    displayName: Publish Terraform Artifacts
    inputs:
      PathtoPublish: '$(build.ArtifactStagingDirectory)'
      ArtifactName: 'tf'
      publishLocation: 'Container'

So – if we have all done this, our build pipeline should work! Please trigger your build pipeline to see if it is working. Best to push the code changes and the should the pipeline automatically be triggered.

Release Pipeline

The release pipeline is responsible for applying our terraform changes in azure. First we are going to create a new release pipeline. For this go again to azure devops -> pipelines -> releases and create a pipeline. Select the “empty job” template and press apply. Then name the stage “acc plan” and close the sidebar window. The release pipelines (at the moment) can not be edited via yaml. So we have to use the user interface. But after we have closed the sidebar our pipeline looks like this:

Image for post
image by author

I have already renamed the pipeline name (on the top) to “Infrastructure Release”. We need to choose the artifact now (in the graphic above it is already done). Press the add button in the artifacts section and choose build as source type. Choose the notifier project and the Infrastructure build pipeline as source like in the graphic below and press add.

Image for post
image by author

Now we add some tasks here. For this please click on the “acc plan” stage on the job link. Then we are in the task view. Click the plus button to add the “terraform install” task. The task here is almost the same like before in the build pipeline, but we have to use the ui here. But there is nothing more to fill out here.

Next we add a further task to authorize to azure. Please select an Azure CLI task and choose our “ARM Notifier” for the “Azure Resource Manager connection”. The script type is “Shell” and choose inline script andput the following into it:

echo "##vso[task.setvariable variable=AZURE_CLIENT_ID;issecret=false]${servicePrincipalId}"
echo "##vso[task.setvariable variable=AZURE_CLIENT_SECRET;issecret=true]${servicePrincipalKey}"
SUBSCRIPTION_ID=`az account show --query 'id' -o tsv`
echo "selected subscription ${SUBSCRIPTION_ID}"
echo "##vso[task.setvariable variable=AZURE_SUBSCRIPTION_ID;issecret=false]${SUBSCRIPTION_ID}"
echo "##vso[task.setvariable variable=AZURE_TENANT_ID;issecret=false]${tenantId}"

Please open the “Advanced” tab and enter the “$(working_dir)” as “Working Directory”. This is an variable which will be set later when have create a task group from our tasks…

Now we came to the last task to initialize, sleect workspace and call the terraform plan or apply action. Choose a new bash task choose “Inline” and put in the following:

terraform init
terraform workspace select $(env) || terraform workspace new $(env)

if [ "$(tf_action)" = "apply" ]; then
       terraform $(tf_action) -auto-approve
else
       terraform $(tf_action)
fi

This script uses two variables (“$(env)” and “$(tf_action)”). Also these vars will be set later… Check here the auto approve flag when applying the changes. And we need to add here the environment variables which came from the azure cli task. So please set these in the “Environment Variables” tab. Add the following:

NameValue
ARM_CLIENT_ID$(AZURE_CLIENT_ID)
ARM_CLIENT_SECRET$(AZURE_CLIENT_SECRET)
ARM_SUBSCRIPTION_ID$(AZURE_SUBSCRIPTION_ID)
ARM_TENANT_ID$(AZURE_TENANT_ID)
Environment Variables

Now is the time to create a task group from our tasks. Which will give us a lot of advantages (faster creating a new deployment stage, changes will be applied globally where task group ist used, etc.). So select these three task like in the image below, right click and choose “create taskgroup”. Name it “Terraform Plan/Apply”.

Image for post
image by author

If this is done we see our task group and have to fill out the variables which we have defined in the tasks. Enter “acc” for environment, “plan” for terraform action and choose the working directory with the configuration files, like in the image below.

Image for post
image by author

Go back to the pipeline view and click clone on the “acc plan” stage (hover over stage and then an icon will appear!). Click on the new cloned stage and rename it to “acc apply” this stage is where terraform will create the resources. This stage should be triggered after the “plan stage” was successful.

Image for post
image by author

And I would create an approval for this. So click the thunder/user symbol to open the pre deployment conditions. Trigger should be “After Stage” and pre deployment approvals enabled with a selected user.

Image for post
image by author

For the production stages we can clone once more the “acc plan” and “acc apply” stage. Let’s do this… After we have done this we change the name to “prd plan” and “prd apply”. Then we have to choose the correct predeployment conditions for each stage. Click on the thunder/user symbol and change the conditions analog to acc stages. (In the prd apply stage we maybe need to deselect the acc stages and select the “prd plan” stage.)

The pipeline view should look like this now:

Image for post
image by author

But now we need to change the variables for each stage. Our “acc plan” is ok, but the other ones are cloned so they need some adjustments. Let’s jump into the task view by clicking the task link in the “acc apply” stage. Select the taskgroup and change the “tf_action” to “apply”. That’s all!

Then choose the “prd plan” stage under the “Task” dropdown and select again the tasgk group and set the “env” to “prd” and the action should be “plan” Do the same thing with “prd apply” stage and check if the action is already “apply”. Then save the pipeline.

Uh one thing would be cool – let’s use continuous deployment trigger. Click on the thunder icon near the artifact and then do the following:

Image for post
image by author

Save the pipeline again! Now the build pipeline and release pipeline should be automatically be triggered and release the plan. And then we only need to approve to roll it out!

Enable Access AKS to use ACR

To give the k8s cluster access to the container registry we need to do that explicitly. Else when we want to deploy something from our registry in k8s we will get an authorization error. Todo this please call the following line with the azure cli.

az aks update -n notifier-aks-acc -g notifier-resource-group-acc --attach-acr notifiercontainerregistryacc

You will ask why we have to do this here and not with terraform. So you need admin rights for your azure portal and the pipeline does not have it. It is possible to configurate this by terraform with azure active directory etc. I do not want to make the things much more complex here, that is why we have to go this way here.

Problems I had to face with

In principle this is all very easy to configure and setup, but there are so many things which could you drive crazy… For example I wanted to use the terraform cli task for all, but there was a strange bug with selecting and then using the right workspace. This was not so easy understand, because I thought I have missed something or whatever. But the task was the problem… However here some other problems which I encountered.

Terraform – Resource Already Imported

First I got some errors after I want to apply my resources. Some resources were already there and I have to import them, although it was the first time I have created them. For this reason I deleted the complete resource group which we used in the PART 1 of the tutorial. Then I read something about it, that there is cache with the terraform azurerm version 2.* which can produce this kind of issue. So if this happens you have to get your state up to date by importing these resources. You can do it by (example from a key vault secret):

terraform import azurerm_key_vault_secret.kvs_webapi_appinsights https://kv-webapi-acc.vault.azure.net/secrets/ApplicationInsights--InstrumentationKey/d9bff6b232d0412fb3aa2d9e9a07961

Terraform – State Container Locked

This occurs, when I wanted to apply terraform changes first locally and then via pipeline. I had an error in my local changes and the apply does not work, then I pushed the fixed code to the repo and the pipeline failed. It says that the container is in lease state. Ok I thought I take a look in azure to that state file in the container, but the container infos said that there is nor lease state. Hm -however I thought… I marked the state as lease by right clicking on that state file and choose the action. After then I removed that state. And now there was no more blocking in the pipeline. May be terraform could not remove the lease state after the error.

Key Vault – Access Policies

First I used the “current azure rm” information for creating resources and access policies, etc. But in that case you have to keep in mind that these values logically differ when you apply resources from you local machine or using the pipeline. And if only one policy is created then we will get into some auth errors when accessing the key vault secrets, because only the creator of the resource has access. To avoid this as I described here in this post, I have added access policies for an azure group and the azurerm service connection.

Conclusion

I have learned here, that it is very easy to setup such a pipeline, but not easy to get it run. For this there is a deeper understanding of azure and terraform needed. But if you go through this you will learn a lot.

So created a good working build and release pipeline for our infrastructure which is working quite well. And it is easily to extend to some more stages/environments!

The updated code for this part can be downloaded from https://dev.azure.com/sternschleuder/Notifier/_git/Infrastructure?path=%2F&version=GBfeature%2Fpart1_1&_a=contents.

Preview

In the next post PART 2 we will create the web api for our notifier web application. Here we will learn to use our created resources inside a .net webapi application.