Using .NET, Angular, Kubernetes, Azure/Devops, Terraform, Eventhubs and other Azure resources.
This post will be he first of a series, because it makes no sense to put all that stuff into one post. So this post will outline the overall demo application and infrastructure and how we will start to develop it.
What do we learn here?
We will build a modern style web application environment which uses a lot of technologies to bring that up and running. We learn how to wire all that pieces together and automate them. Starting by creating the infrastructure in azure using terraform and integrate it with azure devops pipelines. Then we are going to create a simple webapi in .net core which uses azure tables to store data and an event hub for posting messages to our system. After then we need to create multiple worker which can consume our messages. And at least a small functional user interface in angular which uses the webapi. We will talk a lot of configurations, keeping secrets secret and other stuff which can make problems when connecting all those parts.
What we will not do!
This demo application/environment will be far away from a complete production ready application. There will be no authentication or other security things which are extremely important, nor sufficient error handling, unit tests or great design patterns inside each software piece, etc. The pattern here is more the overall environment with pipelines, message broker, small services, etc. The code logic will be very simple, so we can concentrate on things we want to learn here.
Which technologies/tools we will use for coding, deploying and hosting?
For programming the backend will use C#/.NET Core/WebAPI and Angular/TypeScript for the frontend. We use Azure DevOps for the build/release pipelines and source control (.git). The complete infrastructure will be created in Azure with Terraform for defining the infrastructure in code. In Azure we will use Event Hubs as our Message Broker, Azure Tables to store the Notifications, Application Insights as one of our notification receiver, Key Vault to keep our secrets secret, Container Registry for our Docker Images and a Kubernetes Sevice (AKS) for hosting and managing our Docker Container.
What kind of functionality are we developing?
I think of a very small “notifier” application could make sense here. I think with this, we get all parts explored. The functionality is very simple. The app provides an interface for creating, listing and resending notifications to there consumer.
I start explaining the flow at the top of the diagram below. First the user should be able to create a notification via the user interface (made here with angular). The ui calls the web api to create a notification. The web api stores the notification in the table and sends a notification message to the event hub. At least the two consumer (application insights worker and email worker) receive them and do there job. The web api provides an additional “get notifications” endpoint by which the ui can read them. So then the user could select one or the other and resend the notification(s).
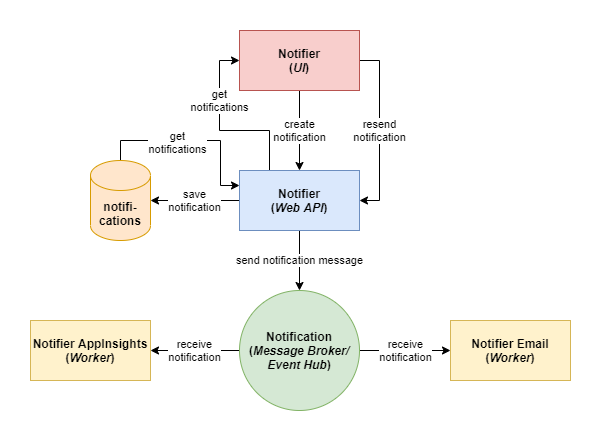
Actually we do not need this “complex building” to realize this simple functionality, but this one has the known advantages of a microservice architecture and scalable system which I will not explain here to keep this short as possible.
What are the next steps?
In each part I will explain one “brick” to get this all to work. I explain in every specific post what we do need and achieve here. In a real world project it would make more sense not to split all the infrastructure tasks in one part (and for example) the web api into another.
Before we are going to start we should prepare a little bit. So we need an Azure DevOps account. And create a project named “Notifier”. Make sure that you choose git for source control! The work item template does not matter to us, because we will not use it. Then we need an Azure account. When we have this done we can start. Following the steps. So then lets go … (But I will spare myself the saying “Let’s get your hands dirty.”)
- PART 1 Infrastructure
- PART 1.1 Infrastructure Pipeline
- PART 2 WebAPI
- PART 2.1 WebAPI Pipelines
- PART 3 Notifier Worker (AppInsights, Email) (coming next)
- PART 3.1 Notifier Worker Pipelines
- PART 4 Angular UI
- PART 4.1 Angular UI Pipelines