Using .NET, Angular, Kubernetes, Azure/Devops, Terraform, Eventhubs and other Azure resources.
This is one part of a series. So if you have not read the PART 0: OVERVIEW you can go there and read it to get an overview of what we will actually doing here …
Introduction
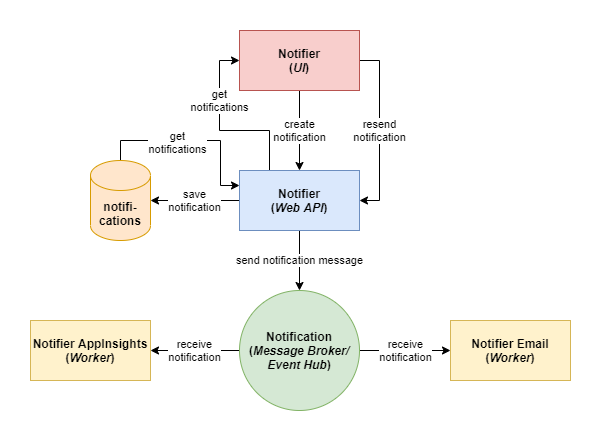
In the last PART 2: WEB API we have created our simple web api in .net core which provides a simple api for getting all messages or posting single messages. The sent messages endpoint will be sent the message to an event hub and from there it can be consumed by our workers ( which we build in the next parts!).
Now we will create a build and release pipeline (CI/CD) for our web api. The build pipeline will build the artifacts and upload the container in our azure registry.
We will create a release pipeline with two stages (acc and prd). The release pipeline will use our keyvaults and apply the secrets as environments vars to the app. We will write k8s deployment, service and ingress files to deploy the web api in our aks.
You can download the code from the git repository.
Deployment Files
Lets start with writing the needed deployment files…
Docker
Start by creating a file named “Dockerfile” in the “./.deploy” folder inside the webapi repository. Put then the following code into it.
This dockerfile is quite simple. It copies the required sources (WebApi and Common) and restore, build and publish the application. After then we define the container’s entry point. But one thing is something which could be important! I have been recognized that when I am using the default rendered dockerfile from visual studio it will not work. It is because the “runtime:3.1-buster-slim” will be used for runtime, but when running in aks it has to be the full sdk. If not then you will get an error on the aks like: “It was not possible to find any installed .NET Core SDKs”.
Kubernetes
To deploy our web api to our aks we need some deployment files. First we create a folder inside the “.deploy” folder and name it “k8s”.
We start by creating a file inside the k8s folder and name it “config.yaml”. Then put the following code into it.
We use this config file to push non secret environment variables to the application. At this time we only have one entry here for the “CORS”. Keep in mind that our web api replaces automatically values in “appsettings” with values from these environment variables.
Now we do the same with the secrets… Create a file named “secrets.yaml” besides the config.yaml. Then put the following code into it.
So here it is the same as with secrets. This variables will be pushed to the application as secrets. We have here the appinsights key, the storage connection string and the event hub connection string. All this secrets will be set inside the release pipeline later with the values from the the azure keyvault.
Now we came to the deployment file for the web api. Please create a file “deployment.yaml” and put the following code into it.
At least this deployment file pull the docker image from the azure container registry and pass our config and secret environment variables to the created pod. The values for the “ENVIRONMENT” and the “RELEASE_ARTIFACTS_BUILD_NOTIFIER_BUILDID” variables came from the release pipeline.
Then we need a k8s service, which let us connect to the application. To do that create a file and name it “service.yaml” and put the following…
We provide a service to connect to the pod over the port 8080. Now we have to provide an ingress which represents the routes for the web api in the aks. …create a file “ingress.yaml” and put the following…
This ingress will receive traffic from our public id which was created in the infrastructure part by creating the helm ingress controller. We can define here a lot, but to keep this simple, we only have one rule which routes all the traffic to our web api application on port 8080.
All this k8s files will be applied by the release pipeline, which we will see later in this post…
Build Pipeline
First we create the build pipeline and initialize terraform for our workspaces and validate them. Furthermore we create the artifact with the terraform files to later create the resources in the release pipeline.
Let’s got to azure devops now and navigate to your notifier project pipelines. The press “create pipeline” and choose Azure Repos Git for your source. Select the “Infrastructure” repository. Choose then “Starter pipeline” and click “Save and run” und yes commit it directly into the master branch. After the job has been successfully finished. Check out the repository changes from the origin. After that you should see “azure-pipelines.yml” file und your “Infrastructure” folder. From here we start to add our needed build stuff. So open the file in your editor and let’s go…
First thing to do is delete all stuff in there and then copy the following.
The trigger sets a branch where the pipeline will be automatically triggered. The repository source is to include the repositories which needed in the build. This is in our case only “self” (the repository which triggered the build). And the pool where we define our vmImage. We set it to latest ubuntu.
If we have this done, we can go to the steps. First delete all the code inside the steps section. (I have moved the pipeline file into a “.deploy” folder – if you want to do that to, you have to change the path from the yaml in the pipeline!) Lets start by setting the base configuration of the pipeline by putting the following code into the empty yaml file.
Here we set the trigger, resources, the pool and some variables. Pay attention to the resource that we include here the needed common lib repository. In the last part I describe the common lib. It is a lib which is used by web api and the workers… So it is an extra repository which you also need to create in you azure devops (if you do not have already done this!) You can download the code from the common lib here.
Now we come to the steps and tasks section… Put the following code directly under the variables section.
It begins with checking out the relevant repositories (self and common lib). In the first task we build the docker image for acc environment by our created docker file.
In the second task we push image to our container registry. The next two steps do the same for prod. You might be thinking why do we have to do the same for different environments… And yes this is only because we wanted to have every resource for every environment. But yes it is also a good idea to share some resources like the container registry. But the other has the advantage that we have real independent resources for every stage…
The next task is to copy our k8s files to the artifacts directory, so it can be uploaded in the last step as an artifact.
When you push your next changes in master branch the pipeline will be automatically triggered and should be run successfully.
Release Pipeline
For this release pipeline an hopefully already configured Azure ARM Service Connection is needed. We used this already in PART 1.1 Infrastructure Pipeline. I will here not go so much in detail of how creating the stages, adding artifacts and adding pre deployment conditions. (How to do this in detail is described in PART 1.1 Infrastructure Pipeline and can be easily adopted.)
Now let’s go to azure devops and create a release pipeline (azuredevops -> pipelines -> releases -> new) and name it “WebApi Release”. Then go to the pipeline in edit mode and start first by adding the web api artifact. At the end we want to have two stages (“acc” and “prd”). Set pre deployment conditions from “acc” to “After Release” and from “prd” to “After Stage -> acc”
Before we adding release tasks we go to the “Variables” tab and set some pipeline variables.
| Name | Value | Scope |
| DOMAIN_URL_BASE_NAME | notifier.com | Release |
| DOMAIN_URL_SUFFIX | -acc | acc |
| DOMAIN_URL_SUFFIX | -prd | prd |
| ENVIRONMENT | acc | acc |
| ENVIRONMENT | prd | prd |
| RELEASE_ARTIFACTS_BUILD_NOTIFIER_BUILDID | $(Build.BuildId) | Release |
| ApplicationInsights__InstrumentationKey | $(ApplicationInsights–InstrumentationKey) | Release |
| EventHubSettings__ConnectionString | $(EventHubSettings–ConnectionString) | Release |
| StorageSettings__ConnectionString | $(StorageSettings–ConnectionString) | Release |
The values for app insights, event hubs and connection string comes from our key vault, which we provide through a task in the next step.
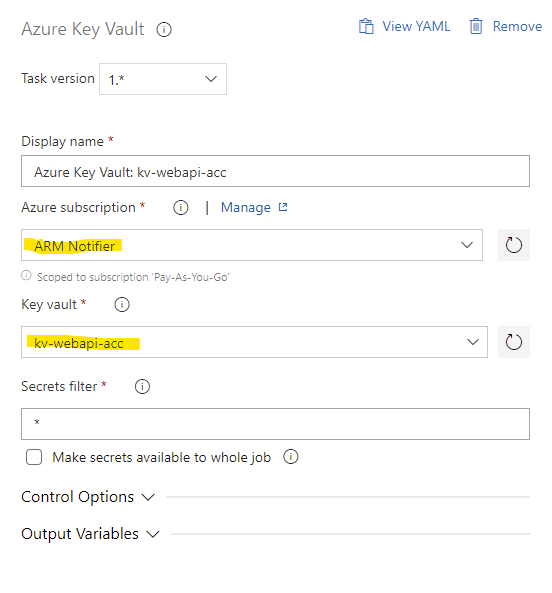
Now we start adding tasks for the release. Please go to the “Tasks” tab and select the “acc” stage. And start adding the first task “Azure Key Vault”. Set ARM Service connection and select the web api key vault. This tasks makes it possible to use the azure key vault inside the pipeline. The real cool thing here is that we have no password here it is all hidden in the key vault and the key vault access is via the service connection.
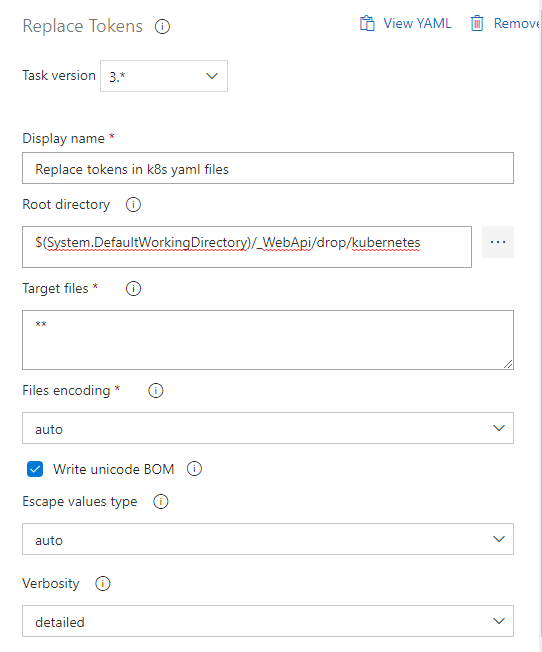
The second task is for replacing the variables in our kubernetes deployment files by the ones from our release pipeline. We choose here the “Replace Tokens” task. Set here the kubernetes folder as root directory. The default values for a replacement match is “startwith=#{” and “endswith=}#”. So we can leave it by default because
The last task is for deploying our web api app to aks! For this we need a further service connection. So go to “Project Settings” and select “Service Connections”. Then click create new service connection from type “Kubernetes” and select your azure subscription and wait for the login window. After then you should see your clusters. Select the acc cluster and give it a name “AKS Notifier ACC”. When you have done this you can go back to your pipeline release tasks and add the last task “Kubectl”.
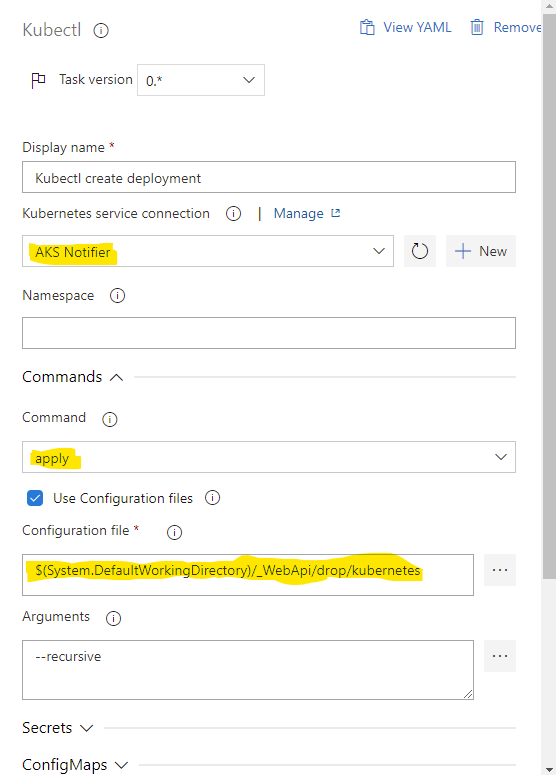
Set here the Kubernetes Service Connection (in my case AKS Notifier – but in your case AKS Notifier ACC – because we have for every stage a k8s cluster). Then select the “apply” command set the path where the kubernetes deployment files are.
Then you should add the same tasks for the “prd” stage which I will not repeat here…
Verify
So ok if we now release the web api and the pipeline runs successfully then we could check if everything is working. To do that please make first a connection to the acc aks…
az aks get-credentials --resource-group notifier-resource-group-acc --name notifier-aks-accand then get the current services…
kubectl get servicesYou should now see the ingress controller which was created by infrastructure. This one should have an external ip. Then you should also see the webapi service connection running on port 8080.
Then you could check the pods…
kubectl get podsWhen the pod is running, then all is good. I f you get an image loop backoff then please run the following command to get more information.
kubectl describe pod POD_NAMEI could guess that in our case it could be that the aks has no authorization to the container registry. When this is then please allow it by typing the following and create a new release.
az aks update -n notifier-aks-acc -g notifier-resource-group-acc --attach-acr notifiercontainerregistryaccIf all work up to here please call the ping (GET) endpoint (which does not uses other resouces like event hubs or something else).
GET http://YOUR_PUBLIC_IP/api/notifications/pingIf you get back “PING” then your ingress routing to your web api is working. Then go a step further lets try to get all notifications.
GET http://YOUR_PUBLIC_IP/api/notificationsWhen you get now an empty array. We are sure that our connection to our azurestorage is working. If this is not working then probably your connection string is wrong or was not set/replaced correctly in the pipeline.
And by posting to the endpoint a message should be sent to event hubs and the message should be saved in the azure table.
POST http://localhost:8080/api/notifications?message=hello this is my messageConclusion
We created here a CI/CD pipeline for our web api, which is now running on an aks. The web api can be reached from outside the cluster and can be used for getting and sending notifications.
Preview
In the next chapter we are going to create the Notifier Workers (app insights, email) which can consume our notifications sent from the web api over the event hub.